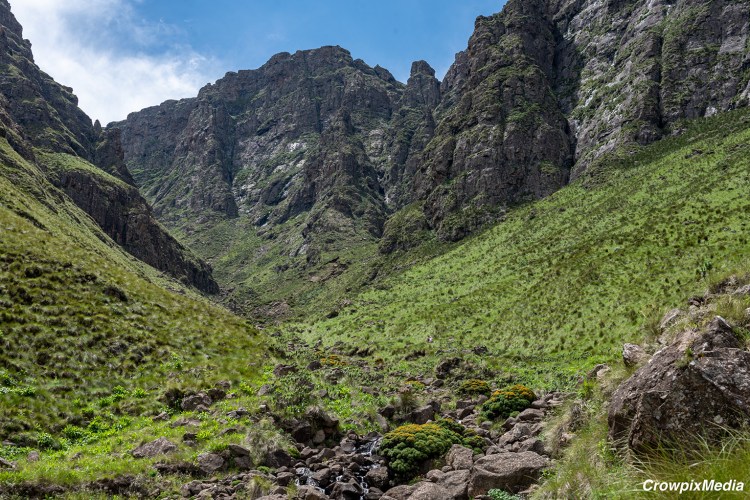
Knowing what equipment suits your needs can be challenging if you’re new to landscape photography. However, I’ve found that a 50mm lens is one of the most versatile and valuable, especially if you want to take landscape or travel photography.
Table of Contents
- Table of Contents
- 50mm Lenses Give a Natural Perspective
- 50mm Lens Has a Wider Aperture Than Other Lenses
- A 50mm Lens is Lightweight And Great for Hiking
- A 50mm Lens is Cheap And High Quality
- 50mm Lens Creative Opportunities
- Some Recommended Digital Camera Settings for Beginners
- In Conclusion
50mm Lenses Give a Natural Perspective
A 50mm lens lets you get closer to your landscape photography subjects and provides a more natural perspective than a wide-angle or telephoto lens. It can be beneficial to focus on a specific part of the scene or emphasise certain parts of the image.
The 50mm lens is often called a “normal” lens because it produces an image that closely approximates what the human eye sees.

This results in a more natural and realistic perspective, which can be especially effective in landscape photography.
With a 50mm lens, a photographer needs to compose within the limits of the 50mm frame. A 50mm perspective balances getting closer to your subject and not being too wide-angle. It requires you to carefully consider your composition, while at the same time, a 50mm composition might feel natural because the angle resembles the view of the human eye.
50mm Lens Has a Wider Aperture Than Other Lenses
The 50mm lens has a wider aperture than other lenses. A wider aperture lets in more light and is better for low-light photography. It is helpful for landscape photography because you often shoot in the evening or early morning when there isn’t much natural light available.
If you’re just getting started with photographing people and have decided that a 50mm is suitable for your needs, this article will help get you going in the right direction. I’m assuming that most people reading this are already familiar with how to use their camera and its settings (ISO, aperture and shutter speed).
You can also read some basics about camera settings further down this post.
A 50mm Lens is Lightweight And Great for Hiking
A 50mm lens is usually small and lightweight, making it easy to carry around and use. The weight and compactness of the 50mm make it an ideal choice for landscape photographers who like to hike and explore the outdoors. The compactness makes it easy to carry around, whether hiking or just for an afternoon stroll with your camera.
Because this lens type is so tiny and has no additional features besides its focal length (which may be too narrow for some photographers), you can use it efficiently, even when shooting landscapes while on the go.
When you use a 50 mm lens, you don’t necessarily need special equipment like tripods or filters. This makes your camera setup light and efficient.
A 50mm Lens is Cheap And High Quality
The 50mm lens is one of the cheapest lenses you can buy, but it still produces a quality image. You can get a 50mm lens for under $100, and it’s excellent for beginners or those who want to try out landscape photography without spending too much money.
It’s also suitable for portraits because its aperture range of 2-22 lets more light in.

The lower focal length is perfect for intimately capturing landscapes without being intrusive or distracting from your subject matter.
A 50mm lens is known for its sharpness and clarity. When photographing landscapes with a 50mm lens, you can expect to capture all the intricate details of the scene, resulting in clear and crisp images.
This lens is also great for conservation photo essays, black-and-white, and wildlife photography.
50mm Lens Creative Opportunities
The 50mm lens can create stunning landscape photographs that are different from the typical wide-angle shots. Using a 50mm lens, you can experiment with composition and framing and create unique images that stand out from the crowd.
- Compression and Perspective: The 50mm lens offers a natural perspective, similar to how our eyes see the world. Additionally, it compresses the scene, making the foreground and background appear closer together. The resultant compression can create a sense of depth and dimensionality in your landscape photographs.

- Versatility: A 50mm lens is versatile and can be used for various types of photography, including wildlife, conservation, and landscape photography. This means you can switch between different genres of photography with the same lens, making it a valuable tool in your photography kit.
Some Recommended Digital Camera Settings for Beginners
If you are new to photography and don’t know all those settings, here are a few easy tips. Digital cameras have a considerable number of different settings, and it can be overwhelming.
Here are important ones for beginners:
Auto Mode
Auto mode is best for beginners, as it will take care for your settings.
You can still adjust them manually if you want to, but for most people just getting started with digital photography, auto mode will be enough.
Suppose you plan to take photos of people or wildlife (or anything else that moves). In that case, the auto mode is also an excellent choice because it allows your camera to select settings based on what it thinks will work best in a given situation.
For example, suppose an animal walks into the frame while you’re shooting an image of scenery. In that case, auto mode may detect this and adjust accordingly so that all parts of your photo look good together without being too blurry or dark due to a high shutter speed used at low aperture values.
Meanwhile, if there aren’t any moving objects around, there’s no need for such extreme measures; this way, there is less chance of something going wrong.
Manual Mode
Manual mode on a digital camera lets you control the camera settings, including shutter speed, aperture, and ISO.
Here’s a step-by-step guide on how to use manual mode on your digital camera:
- Set your camera to manual mode: Set the mode dial on the camera’s top to “M.”
- Adjust your aperture: The aperture controls the amount of light entering the camera and affects the depth of field (how much of the image is in focus). A smaller aperture (higher f-stop number) creates a deeper depth of field, while a larger aperture (lower f-stop number) creates a shallower depth of field. Adjust your aperture using the camera’s dial or menu.
- Adjust your shutter speed: Shutter speed controls the time the camera’s sensor is exposed to light. A faster shutter speed freezes action, while a slower one creates motion blur. You can adjust your shutter speed using the camera’s dial or menu.
- Adjust your ISO: ISO controls the camera’s sensitivity to light. A higher ISO allows you to shoot in low-light situations, creating more digital noise (grain) in the image. A lower ISO makes a cleaner appearance but may require more light to expose the photo properly. Adjust your ISO using the camera’s dial or menu.
- Adjust your white balance: White balance controls the colour or temperature of the image. It is vital when shooting under different types of light, as it can affect the colour accuracy of your photos. You can adjust your white balance using the camera’s menu.
- Take a test shot and review the image. Check your exposure and adjust your settings. Adjust your settings and take test shots until you achieve the desired result.
Using manual mode, you can completely control your camera settings and create images with the exact look and feel you want. It may take some practice to master, but the results are worth it.
HDR Mode
HDR stands for High Dynamic Range, and it refers to a technique in digital photography that involves capturing multiple images of the same scene at different exposure levels and then merging them to create a final image with a more comprehensive dynamic range than a single exposure could capture.
High-dynamic-range (HDR) photography aims to produce an image that more closely resembles what the human eye sees. The human eye can perceive a broader range of light than most cameras can capture in a single shot.
To create an HDR image, a photographer typically takes three or more photos of the same scene at different exposures, using a tripod to keep the camera steady and, most times, switching to manual focus.

Specialised software then combines the best parts of each direction to create a final image with more detail in both the shadows and highlights.
A photographer can use HDR in various situations, such as landscape, architectural, and interior photography, where the scene has a wide range of brightness levels. However, it is essential to note that not all scenes are suitable for HDR photography. It is vital to use the technique judiciously to avoid creating images that look unnatural or over-processed.
HDR photography is best suited to contrast compositions with lighting extremes, such as dark and very light areas across the frame, like the deepest sunset or sunrise lighting scenarios.
Landscape Mode
Landscape mode is the go-to setting for shooting landscapes, as it automatically sets your camera up for what it needs to do, but I recommend that you always aim to learn to shoot landscapes in manual mode.
Some of the most important settings to keep in mind are:
- Turn on grid lines: Grid lines will help you line up your shot, especially using a tripod or other stabiliser.
- Use a narrow aperture setting: To achieve greater depth of field (the area between in-focus and out-of-focus), select an f-stop number on your lens, like f/8 or f/16; larger numbers mean more depth of field (meaning more things will be sharp), while smaller numbers mean less depth of field (meaning fewer things are sharp).
- Use a low ISO setting: this helps reduce noise in photos taken at night or indoors, where lighting isn’t optimal, making them look better overall.
In Conclusion
To improve your landscape photography, consider investing in a 50mm lens. This lower focal length is perfect for intimately capturing landscapes without being pushy or distracting from your subject matter. It will allow you to get close-up shots without being intrusive or distracting from your subject matter.
Enjoy experimenting with these landscape photography tips.
Copyright@Crowpixmedia. All Rights Reserved 2026.

I totally agree. Even telephoto lens have their place when photographing landscapes. There are a lot of times when one wants the background to be larger than what you get with wide angle lens
LikeLike