
Black-and-white landscape photography is a style that captures outdoor scenes in grayscale tones. It involves using black-and-white film or converting digital images to black-and-white in post-processing to create a timeless, classic look.
In this style of photography, the focus is on the composition, contrast, and tonal range of the image.
Without the distraction of colour, the photographer can emphasise the interplay of light and shadow, textures, shapes, and lines in the scene. Black-and-white images can create a dramatic, moody, or even surreal effect.
Black-and-white landscape photography has a long history, dating back to the early days of photography. It remains a popular genre today, with many photographers drawn to its aesthetic and creative possibilities. While it can be a great way to hone your skills, it’s also easy to get stuck in a rut.
Try some tips for exploring new ideas and adding something special to your photos.
Table of Contents
- Table of Contents
- Get a Wide-Angle Lens Perspective
- Consider Using Long Exposures
- Shoot a Macro Shot
- Always Check The Foreground in Your Composition
- Take Advantage of Cloud Patterns and Natural Elements
- Include Other Elements to Add Interest to Your Shot
- In Conclusion
Get a Wide-Angle Lens Perspective
A wide-angle lens is your best bet for creating a landscape photo that captures the sky and ground. Wide-angle lenses allow you to get more of the scene in focus, making it easier to capture both the earth and sky in one shot.
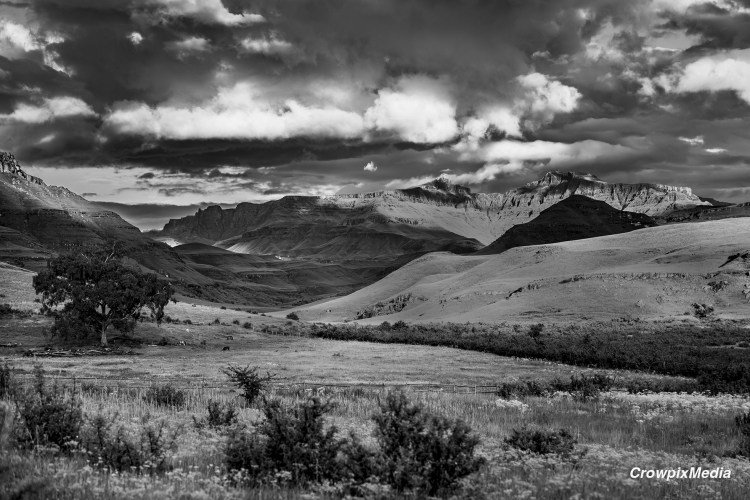
They also give a more sweeping view of your subject matter than telephoto lenses do, which can help make your images feel more expansive. It’s important to note that no hard and fast rules exist when choosing which focal length suits any given landscape situation.
Depending on the look or feel you’re going for, you may want something more narrow or longer. So, it is essential to consider the lens or lenses you anticipate using before setting out on your landscape photography mission.
Consider Using Long Exposures
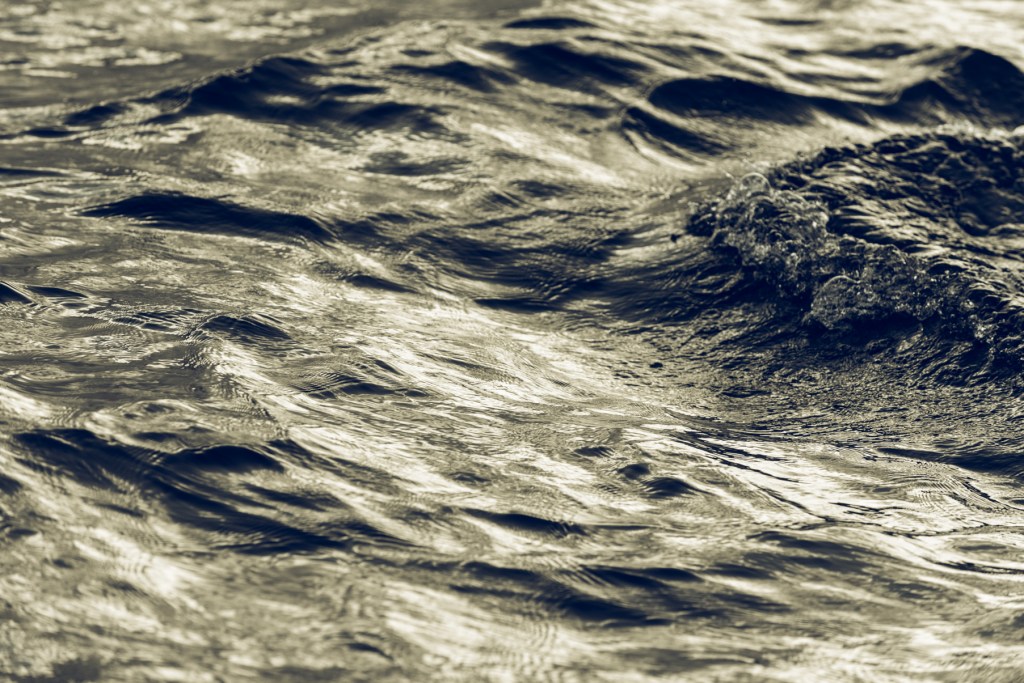
Long-exposure landscape photography uses a slow shutter speed to capture the movement of elements in the landscape, such as clouds, water, and vegetation. A long-exposure technique can create stunning and dramatic images that convey a sense of motion and emotion.
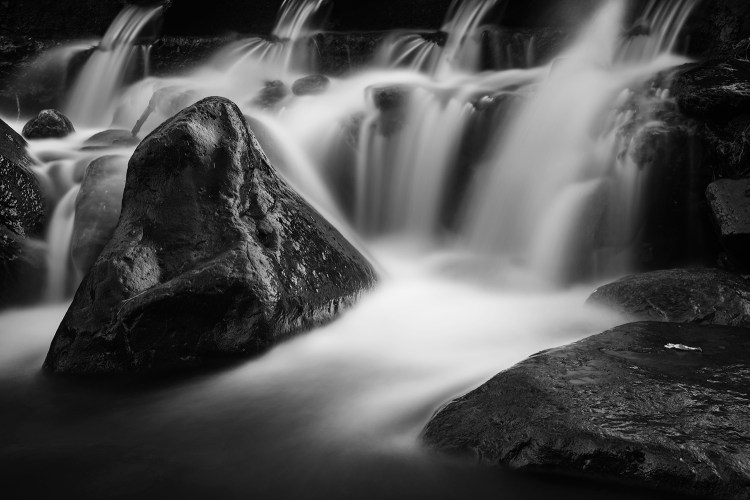
To create a long exposure landscape photograph, you will need a camera that allows you to control the shutter speed, a sturdy tripod to keep the camera steady, and a remote shutter release or self-timer to minimise camera shake.
Here are some tips for getting the best results:
- Choose a scene with exciting elements that will create movement in the frame. Exciting features could include a waterfall, waves crashing on a beach, or clouds moving across the sky.
- Set up your camera on a tripod and compose your shot. Use the rule of thirds to create a balanced and visually appealing image.
- Use a low ISO setting to reduce noise in the image.
- Set your camera to aperture priority mode and choose a small aperture (e.g. f/11 or higher) to create a deep depth of field.
- Set your shutter speed to a slow value, typically several seconds or more, depending on the amount of movement you want to capture.
- Use a neutral density filter to reduce the light entering the lens. This allows you to use a longer shutter speed without overexposing the image.
- Use a remote shutter release or self-timer to minimise camera shake.
- Experiment with different shutter speeds and exposures to find the perfect balance between motion blur and sharpness.
Long-exposure landscape photography can be challenging, but with practice and patience, you can create stunning and unique images that capture the beauty and motion of the natural world.
Shoot a Macro Shot
The next step is to shoot a macro shot. A macro shot is a photograph where the subject of your photo is very close to the camera and appears more prominent than life-sized.
A macro photograph involves getting close to your subject and moving in as far as possible before you reach any limit on how close you can get (such as running out of room).
You can also use lenses with built-in extension tubes or bellows to focus at extremely short distances without touching your lens against anything else.
Here are a few basic steps for macro photography:
- Choose a subject: Pick a small scene or detail you want to capture. It could be a flower, a leaf, a coin, or anything that catches your eye.
- Use a macro lens: Macro lenses are designed to capture small details at close range. They allow you to focus on objects only a few inches from your camera.
- Set up your shot: Find a well-lit area with a plain background that won’t distract from your subject. Consider using a tripod to keep your camera steady and reduce camera shake.
- Adjust your camera settings: Use a low ISO setting to reduce noise and a wide aperture to create a shallow depth of field. This will blur the background and make your subject stand out.
- Focus carefully: Use manual focus or autofocus to get your subject in sharp focus. Move your camera back and forth until you find the spot where your subject is ideally focused.
- Take your shot: When you’re happy with your composition and focus, press the shutter button and take your shot. Review your photo to make sure you captured the details you wanted.
Always Check The Foreground in Your Composition
When it comes to landscape photography, you want to ensure that your subject (the landscape) is the main focus. Focusing on the landscape means that if there are any other details in the foreground, they should be subtle and not too distracting.

If you want to include some details in the foreground of your shot, make sure they’re not too large or bright so as not to take away from what’s supposed to be happening in the background.
You can also try using an aperture setting that will blur out these objects slightly so they don’t stand out too much from each other or their surroundings.
Take Advantage of Cloud Patterns and Natural Elements
Clouds add interest, create a mood or feeling, and add depth and contrast to your photo. Cloud patterns and colours can add depth and interest to your landscape photography.

Here are some tips for taking advantage of them:
- Look for contrasting colours: When you see clouds in the sky, look for contrasting colours in the landscape. For example, if there are bright white clouds in the sky, try to find something dark or black in the foreground to create a sense of contrast.
- Use the rule of thirds: When composing your shot, use the rule of thirds to place the horizon line and the clouds in the frame. This will create a more balanced and visually appealing image.
- Wait for the golden hour: The golden hour, which is the hour after sunrise or before sunset, is a great time to capture the colours of the clouds. The light is warm and soft during this time, creating stunning colours and patterns in the sky.
- Use a polarising filter: A polarising filter can enhance the colours and contrast of clouds and landscapes. It can also reduce glare and reflections on water or other shiny surfaces.
- Experiment with exposure: Try different exposures to capture the details of the clouds and the landscape. A more prolonged exposure can create a sense of movement in the clouds, while a shorter exposure can freeze their motion.
- Shoot in RAW: Shooting in RAW format will give you more flexibility to adjust the colours and contrast of your photos in post-processing. For example, you can bring out the clouds and landscape’s details and colours to create a more striking image.
Remember, always be mindful of your surroundings and safety when photographing landscapes.
Include Other Elements to Add Interest to Your Shot
- Include a human element. A person can make the most ordinary landscape look more attractive. The person could be you or someone else in the frame, going about their business. It’s also important to remember that not all humans are created equal; if you’re shooting people who aren’t models or actors, it might be best to keep them out of focus and at arm’s length so they don’t distract from the scenery around them!
- Include a sky element. If you’re photographing during overcast conditions (or even if it looks like there might rain), consider including something like clouds in your shot–they’ll add depth and drama to what would otherwise be an ordinary photo of trees against the blue sky! Ensure they don’t cover up too much of your foreground elements unless that’s what you want!
- Include water elements such as lakes or rivers; these provide another layer onto which light can reflect onto nearby landforms such as mountainsides/hillsides/etc. (and vice versa). When done correctly, including these elements makes for some pretty amazing photographs: think about how beautiful those reflections are on Lake Tahoe—they almost look like mirror images.

A black-and-white landscape photo can be more than just sharp lines and an array of shades. It can also have a strong emotional impact, have a timeless quality, and even be more creative than colour photos.
In Conclusion
Now that you know how to perfect your black-and-white landscape photography, go out there and shoot some amazing shots! With these tips in mind, we hope you’ll be able to take your photos from good to great in no time at all.
Copyright@Crowpixmedia. All Rights Reserved 2026.

Beautiful images
LikeLike
Sorry for the delayed response but thank you for your comment.
LikeLike