When you first started taking photos, the best thing about it was that it was fun. You were excited to capture anything and everything in front of you and didn’t always stop to consider the importance of the composition to your photos.
But as you continue to take pictures on your photography journey, your personal style and creativity evolve. Inevitably, you will reach a stage where you seek to take your photography skills to the next level.
Composition is one way to improve overall photography. While composition is often subjective, some valuable concepts can immediately improve one’s understanding.
Table of Contents
- Table of Contents
- Firstly, why does composition matter in photography?
- The Golden Ratio
- How to effectively use the Golden Ratio in photography composition
- Panoramas
- Use focus stacking
- Bracketing exposures
- Abstract composition
- Get a new perspective
- Try shooting with a telephoto lens
- Experiment with macro photography
- Use framing techniques for landscapes
- Use imagery that contrasts with your subject’s background
- Keep the horizon level
- Create depth by using depth-of-field layers
- Avoid cutting your subject out of the frame
- Consider contrast
- Conclusion
Firstly, why does composition matter in photography?
Composition is the way you arrange your subject in the frame. It can make your photo more exciting and appealing to others, help you tell a story, and make your photos more memorable.
It can take some time to get used to thinking about your shots in terms of composition, but this practice will pay off over time. The more you practice looking at the world through a compositional lens, the better your photos will become.
Composition can give you more control over how your photos look, and you’ll be able to take pictures that are more likely to be seen and liked by others. Composition can make or break a picture, but can also be learned and improved through practice.
Composition is an integral part of creating a great image when taking photos. Composition refers to what’s in focus, who gets more attention from being closer to the centre of attention (or “focus”), and where people look when they view a photo.
The main thing to remember is that composition isn’t just about having a good-looking subject; it’s also about balancing different elements within your photo to work together, creating harmony and balance within the picture. To help you understand how to make a good composition every time you pick up your camera, we’ve put together this guide on mastering the art of composition in photography.
Have you heard of the Golden Ratio? If not, this article will discuss this popular composition technique and other handy composition considerations for your next outing.
Let us dig deeper into the concept of photography composition.
The Golden Ratio
The golden ratio has fascinated artists and mathematicians alike for many years. It was first observed in a geometric construction of two squares by an Italian mathematician named Filippo Brunelleschi, and is a mathematical constant that appears throughout nature and art.
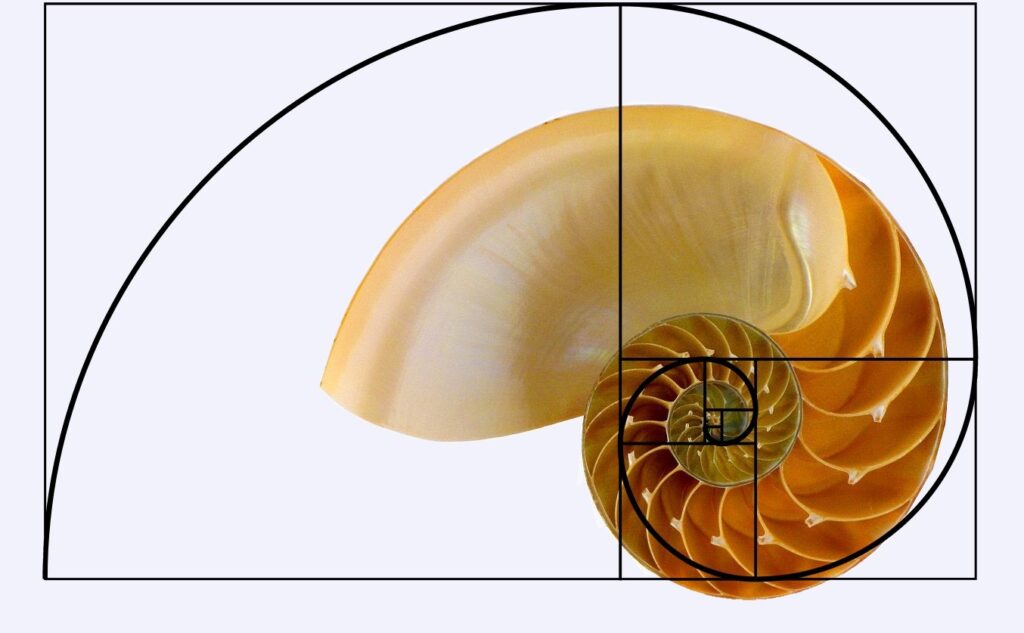
The golden ratio, also known as the golden section, golden mean, or Divine Proportion, is a mathematical concept frequently found in nature, art, and architecture. It is a ratio of 1 to 1.618 (or approximately 0.618 to 1) and is denoted by the Greek letter phi (φ).
In simple terms, when two quantities have a ratio of roughly 1:1.618, they are said to be in the golden ratio. Artists and designers have used this ratio for centuries to create aesthetically pleasing and harmonious compositions. It is also found in natural objects such as seashells, sunflowers, and spiral galaxies.
The Fibonacci Sequence
The Fibonacci Sequence is a series of numbers in which each is the sum of the two preceding numbers. The sequence starts with 0 and 1, and the following number in the line is the sum of the previous two numbers.
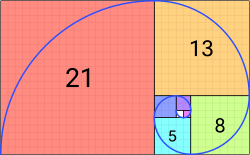
So the sequence goes 0, 1, 1, 2, 3, 5, 8, 13, 21, 34, and so on. This sequence is named after Italian mathematician Leonardo Fibonacci, who introduced the sequence to the Western world in his book Liber Abaci, published in 1202.
The Fibonacci Sequence is closely related to the golden ratio, a mathematical concept in nature, art, and architecture.
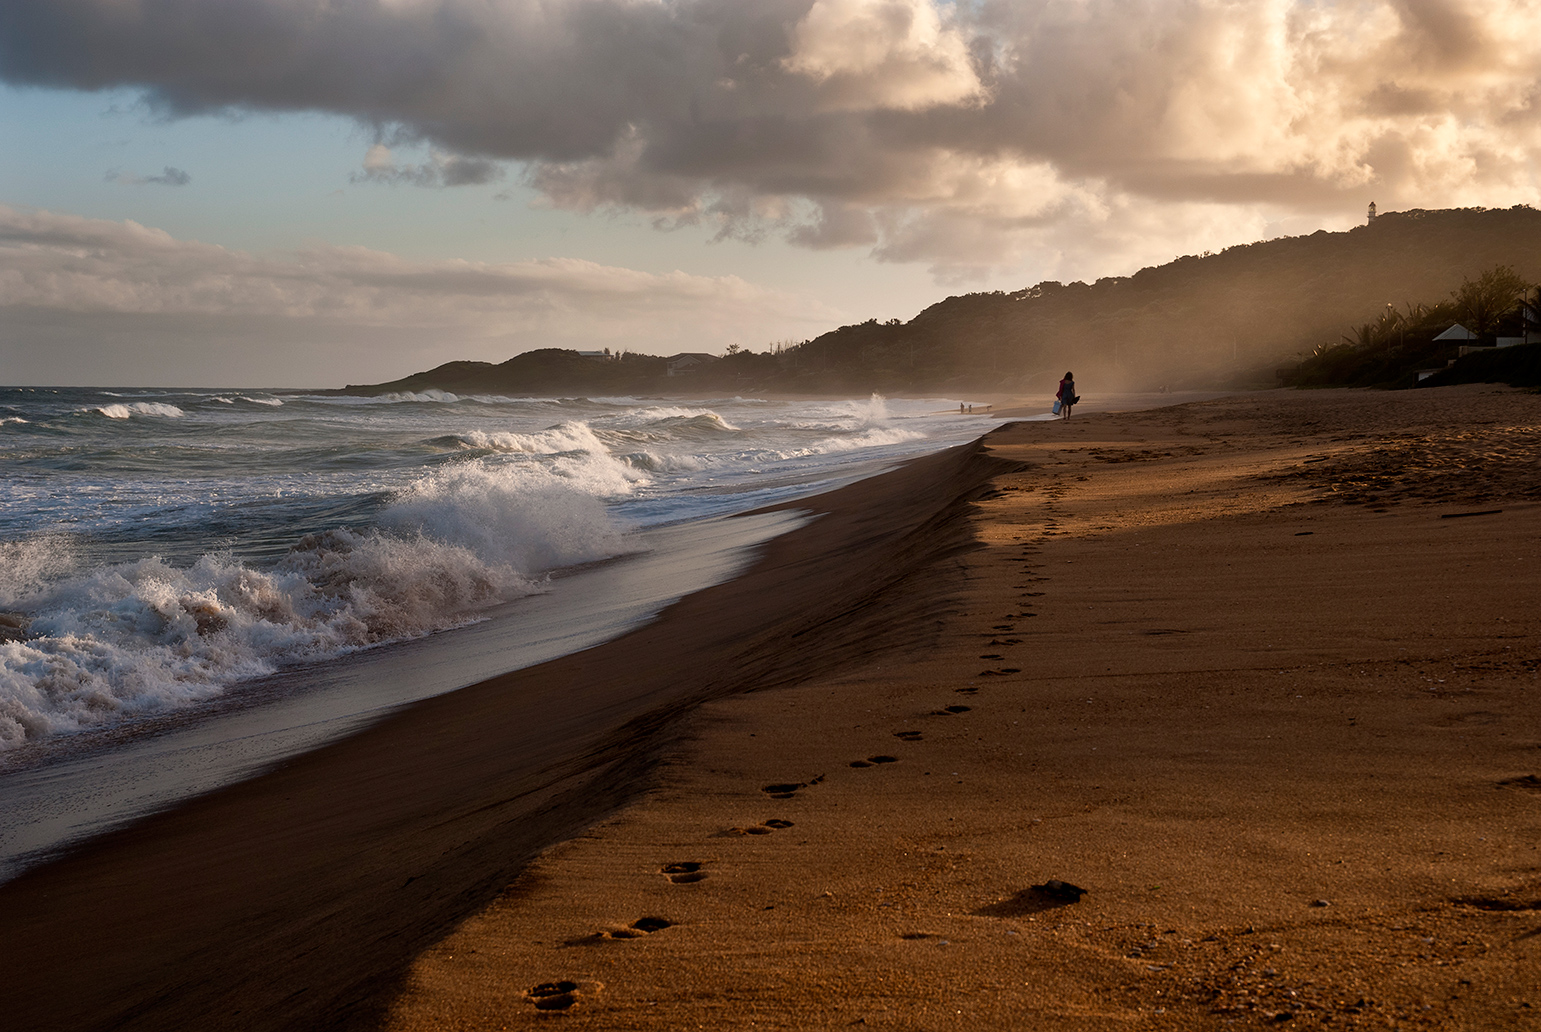
How to effectively use the Golden Ratio in photography composition
The ratio between the sides of the smaller square and larger square is 1:0.618—which, when squared, turns out to be just under 1.618 (the actual value is 1.618033988749895).
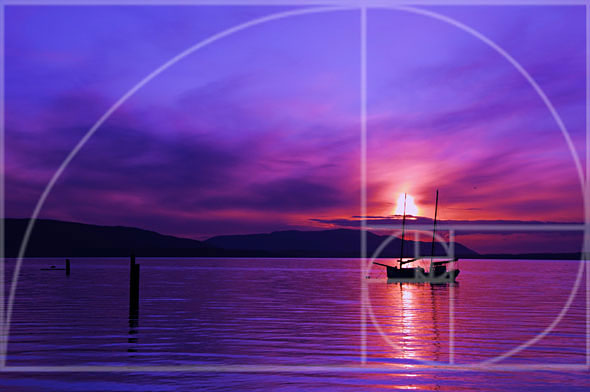
This proportion is found throughout art and architecture, from ancient Greek temples to Renaissance paintings to modern furniture design.
There are many ways to use the golden ratio in photography composition to create stunning and compelling images.
- Use the Golden Ratio as a compositional guide: The basic idea is to place the photo’s subject on a point that falls along the Golden Ratio. You can use the Golden Ratio to determine the placement of your horizon line or where to place the main subject in your frame.
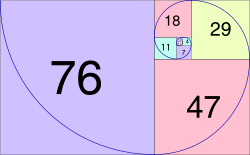
- Apply the Fibonacci Spiral in your composition: The Fibonacci Spiral is derived from the Fibonacci Sequence and is a visually appealing spiral that can guide your composition. You can place your subject along one of the spiral curves to create a balanced and harmonious photo.
- Use the Phi Grid to guide your composition: The Phi Grid is based on the golden ratio, which creates well-balanced pieces. You can use it to place your photo’s subject and other elements in an aesthetically pleasing way.
- Remember that the Golden Ratio is a guide, not a rule: While it can be a helpful tool, it’s important not to get too caught up in following it strictly. Sometimes, breaking the rules can lead to more exciting and dynamic photos.
Panoramas
Panoramic photography is a technique that captures a wide-angle view of a scene, allowing you to capture more of the surrounding environment than a traditional photograph. Composition in panoramic photography is crucial to creating visually appealing and balanced images. Here are some tips for design in panoramic photography:
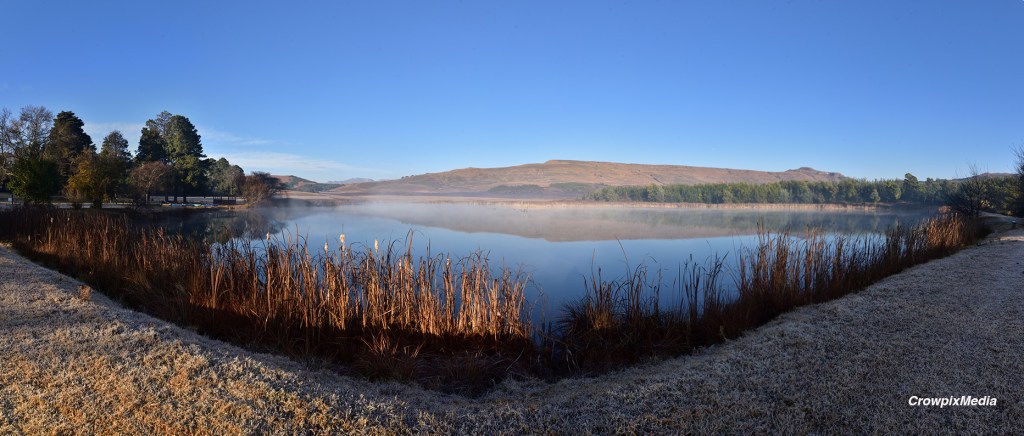
- Select a Suitable Scene: Look for scenes with exciting elements throughout the field. Panoramas work well for landscapes, cityscapes, seascapes, and other wide-angle subjects.
- Use a Tripod: Stability is essential for panoramic photography to ensure that each frame aligns appropriately. Use a sturdy tripod to keep your camera steady during the capture process.
- Plan Your Shot: Visualise the final image in your mind before you start shooting. Determine the direction and angle of the panorama and consider the placement of key elements within the frame.
- Overlap Frames: To create a seamless panorama, overlap each frame by about 20-30%. This overlap provides enough visual information to stitch the images together during post-processing.
- Consider the Foreground: Pay attention to the foreground elements, as they can add depth and interest to your panorama. Include objects like rocks, trees, or people to create a sense of scale and a more engaging composition.
- Mind the Horizon: Keep the horizon level across all frames to maintain consistency. A tilted horizon can be distracting and make it more challenging to stitch the images together accurately.
- Leading Lines: Utilise leading lines within your scene to guide the viewer’s eye through the panorama. Roads, rivers, fences, or architectural lines can lead the viewer from one side of the image to another, creating a sense of continuity.
- Rule of Thirds: Apply the rule of thirds to divide your composition into a grid of nine equal sections. Try positioning key elements, such as the horizon or focal points, along these gridlines or intersections to create a balanced and visually pleasing composition.
- Attention to Exposure: In panoramic photography, lighting conditions vary. Ensure you expose each frame correctly to avoid overly bright or dark areas. Bracketing your shots or using HDR techniques can help capture a broader range of tones.
- Post-Processing: Using photo stitching software to merge the frames into a single panoramic image after capturing the images. Please pay attention to any inconsistencies in exposure or colour and adjust them during post-processing to create a seamless and well-balanced final image.
Remember, these are just guidelines. Experimenting with different compositions and techniques is critical to developing your style in panoramic photography.
Use focus stacking
Although the shallow depth of field is terrific, there are some situations where you want the majority of the picture to be in focus. Consider the times you take product photos, macro shots, or even landscape shots.
In certain situations, specifics are crucial. How do you take pictures that are that sharp?
Although using small apertures is an option, too small an aperture results in diffraction, softening your photographs. The best option is to employ a method called focus stacking.
Focus Stacking Technique
Stacking photos involves shooting a series of images across a focal range. So, you end up with a series of pictures with each part of a subject in focus. Using this technique, you take multiple images of the same subject or scene by shifting your plane of focus in each photo.
Once you’ve taken the photos, you can use software to stack them all up and obtain a single sharp final image from front to back.
You can follow these steps for focus stacking:
- Set your camera on a tripod and compose your shot. Once set, make sure the composition doesn’t change. If it does, you’ll need to start all over.
- Confirm no camera settings and lighting changes to ensure all images come out consistently. In the case of landscapes, you’ll thus need to be quick. Start with an aperture with a good field depth, like f/8, choose a shutter speed based on the lighting (but not too slow), and use a low ISO value for a clean and detailed image. Feel free to adjust the settings as per your requirements.
- The only thing you will change in this process is the focus point. Start by placing your focus point at the front or the back. After every shot, move the focus point a bit closer to the opposite end. Continue this until you reach the other end of the scene from where you started.
Once you are done with these steps, you should have a few photos. The exact number will vary depending on the subject. The next step is to load all the images into Photoshop and get the final, sharp image:
- Ensure that all the photos are saved to the same folder.
- In Photoshop, go to File>Scripts>Load Files into Stack.
- Browse for your images, and click OK with “Attempt to Automatically Align Source Images” checked. This will eliminate any small misalignments caused by the camera or the subject’s movement.
- Next, Photoshop will align and load all the images into layers. Select all the layers and go to Edit>Auto-Blend Layers. Select Stack Images and hit OK.
- Photoshop will now analyse all the images and mask soft or blurry parts. Thus, the final image will appear in focus from front to back.
Bracketing exposures
Bracketing exposure is a technique in photography in which multiple images of the same scene are captured at different exposure settings. This helps ensure well-exposed images by capturing details in the highlights and shadows.
Here are some tips for bracketing exposures and using them effectively in photography composition:
- Set Your Camera to Bracketing Mode: Most cameras have a bracketing mode, allowing you to automatically capture a series of images with varying exposures. Check your camera’s manual to learn how to enable and adjust the bracketing settings.
- Determine the Exposure Range: Decide how many exposures you want to capture and the exposure increments between each shot. Standard settings include ±1EV (one-stop difference) or ±2EV (two-stop difference), but you can adjust this based on the scene’s dynamic range.
- Use a Tripod: To ensure that each bracketed shot aligns perfectly, use a sturdy tripod to keep your camera steady throughout the series of exposures. Using a tripod helps prevent any unintentional movement between shots.
- Composition: When bracketing exposures, pay attention to your composition. Remember that you will capture multiple shots, so ensure your subject and framing remain consistent across all exposures.
- Evaluate the Histogram: After capturing the bracketed shots, review the histogram on your camera’s LCD screen to ensure you have caught a wide range of tones. Check for any clipping in the highlights or shadows.
- Merge in Post-Processing: Use photo editing software like Adobe Lightroom or Photomatix to merge bracketed exposures. These programs can align and blend the exposures to create a final image with a balanced exposure and enhanced dynamic range.
- Creative Use of Bracketing: While the primary purpose of bracketing is to capture a well-exposed image, you can also use it creatively. For example, you can merge the bracketed shots to create an HDR (High Dynamic Range) image, which showcases a broader range of tonal values and can result in more dramatic and visually striking compositions.
- Manual Exposure Bracketing: If your camera has no automatic bracketing mode, you can manually adjust the exposure settings for each shot. Capture one image with the recommended exposure, then change the settings for subsequent photos based on your desired range.
Bracketing exposures is a powerful technique that allows you to capture a broader range of tones and ensure optimal exposure in challenging lighting conditions. It provides more flexibility during post-processing, enabling you to create well-balanced and visually appealing compositions.
Experiment with different exposure settings and merging techniques to achieve the desired creative effect.
Abstract composition
Abstract photography composition refers to the arrangement and organisation of elements within an image to create a non-representational or non-literal visual representation. Rather than specific objects or subjects, it often focuses on shapes, lines, colours, textures, and patterns.

When working with abstract photography composition, here are some key considerations:
- Simplification: Abstract compositions often simplify the scene or subject matter by eliminating unnecessary elements. Look for interesting shapes, forms, or patterns that can be isolated from the larger context.
- Lines and Shapes: Pay attention to lines and shapes within the frame. Experiment with straight lines, curves, diagonals, or geometric shapes. They can create a sense of movement, rhythm, or structure within the composition.
- Colours and Textures: Colours and textures play a significant role in abstract photography. Experiment with contrasting or complementary colours to create visual impact. Look for exciting textures or surfaces that can add depth and tactile qualities to the image.
- Patterns and Repetition: Explore ways of repetition within your composition. These elements can create a sense of rhythm and visual interest. Look for recurring shapes, forms, or motifs that can be emphasised or juxtaposed.
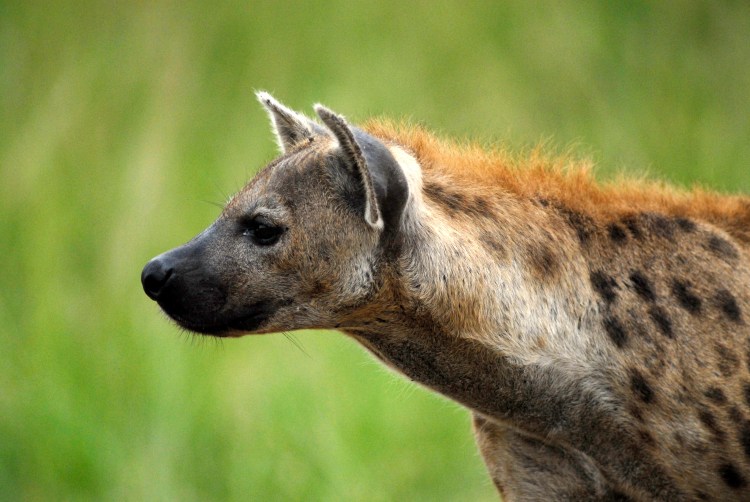
- Point of View: Experiment with different angles and perspectives to create unique compositions. Try shooting from a low or high vantage point, or consider unusual camera angles to provide a new and abstract philosophy.
- Negative Space: Effectively utilise negative space to enhance the impact of the main subject. Negative space refers to the empty or unoccupied areas within an image, and it can provide balance and emphasise the main elements.
- Experimentation and Exploration: Abstract photography offers plenty of room for experimentation and creativity. To achieve unique and abstract results, don’t be afraid to try unconventional techniques, such as long exposures, intentional camera movement, multiple exposures, or double exposures.
Remember, abstract photography composition is subjective and open to personal interpretation. It’s about conveying emotions, impressions, or visual experiences rather than capturing a literal representation of reality. So, let your creativity guide you and explore different possibilities to create compelling abstract compositions.
Get a new perspective
Getting a new perspective is one of the most important things to remember when considering your photography composition. You don’t have to search for bizarre viewpoints.
Look around and see what catches your eye. A new view can be as simple as getting down low or up high, but it also means looking for unusual and unexpected angles.

For example, let’s say you’re taking pictures at your local park one day and see an incredible tree with interesting branches hanging down from it. Your first instinct might be to photograph the tree itself, and there’s nothing wrong with doing so, but why not try capturing those branches instead?
Get down on one knee or lie flat on the ground so they’re all in the frame. Another option would be to find an unusual angle on something familiar, like clouds in the sky.
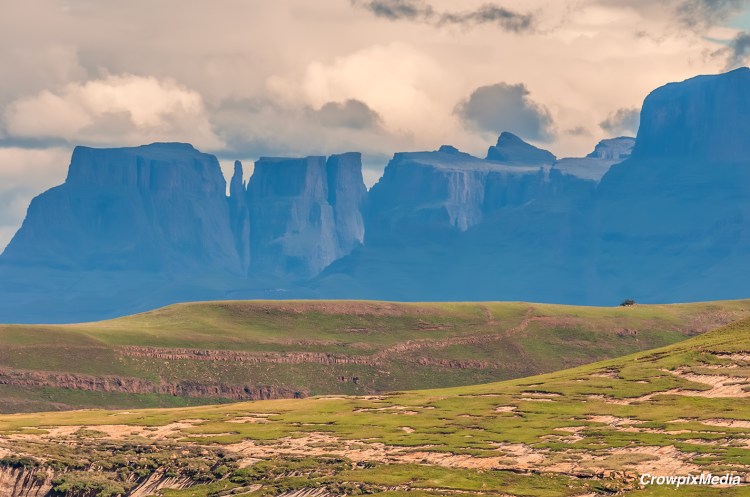
Try shooting with a telephoto lens
A telephoto lens can be a lifesaver. These lenses take images of subjects far from the photographer. The longer the focal length of the lens (measured in millimetres), the greater its ability to magnify objects that would otherwise appear tiny in real life.
Composing photographs with a telephoto lens can be an excellent technique for creating dynamic and visually compelling images. With a telephoto lens, you can isolate specific elements in your scene, such as a bird perched on a tree or an interesting cloud formation, and create a more intimate and focused composition.
It’s essential to consider the distortion and compression effects of using a telephoto lens, as they can alter the appearance of your subject and the context of your image. Experimenting with different focal lengths and compositions can help you find the sweet spot where your subject is the main focus while maintaining a sense of environment and surrounding context. Incorporating a telephoto lens into your composition strategy can open up new creative possibilities and help you capture unique and memorable images.
However, telephoto photography can quickly become expensive. Many professional photographers prefer high-end models with image stabilisation and autofocus capabilities. In that case, affordable options are available. Third-party lenses by companies like Tamron and Sigma offer comparable quality at lower prices than name brands like Canon or Nikon.
Experiment with macro photography
Macro photography is a type of photography in which the subject’s size is significant to the size of the image. It involves a lens or extension tube attached to your camera, increasing its magnification power. Macro photography can capture details of subjects such as flowers and insects that you wouldn’t usually notice with your naked eye.
Experimenting with macro photography composition can be a fun and rewarding experience. It allows you to explore new perspectives and create visually attractive images.

When framing your macro shots, consider the elements that contribute to a strong composition, such as leading lines, shapes, textures, and negative space. For example, you might use leading lines to draw the viewer’s eye to your subject or incorporate the surrounding environment to provide context and scale.
Another approach is to play around with different angles and viewpoints, such as shooting from a low perspective to emphasize the height of your subject or using a shallow depth of field to blur the background and isolate your subject. Ultimately, the best way to improve your macro photography composition skills is to practice and experiment with different techniques and see what works best for you.
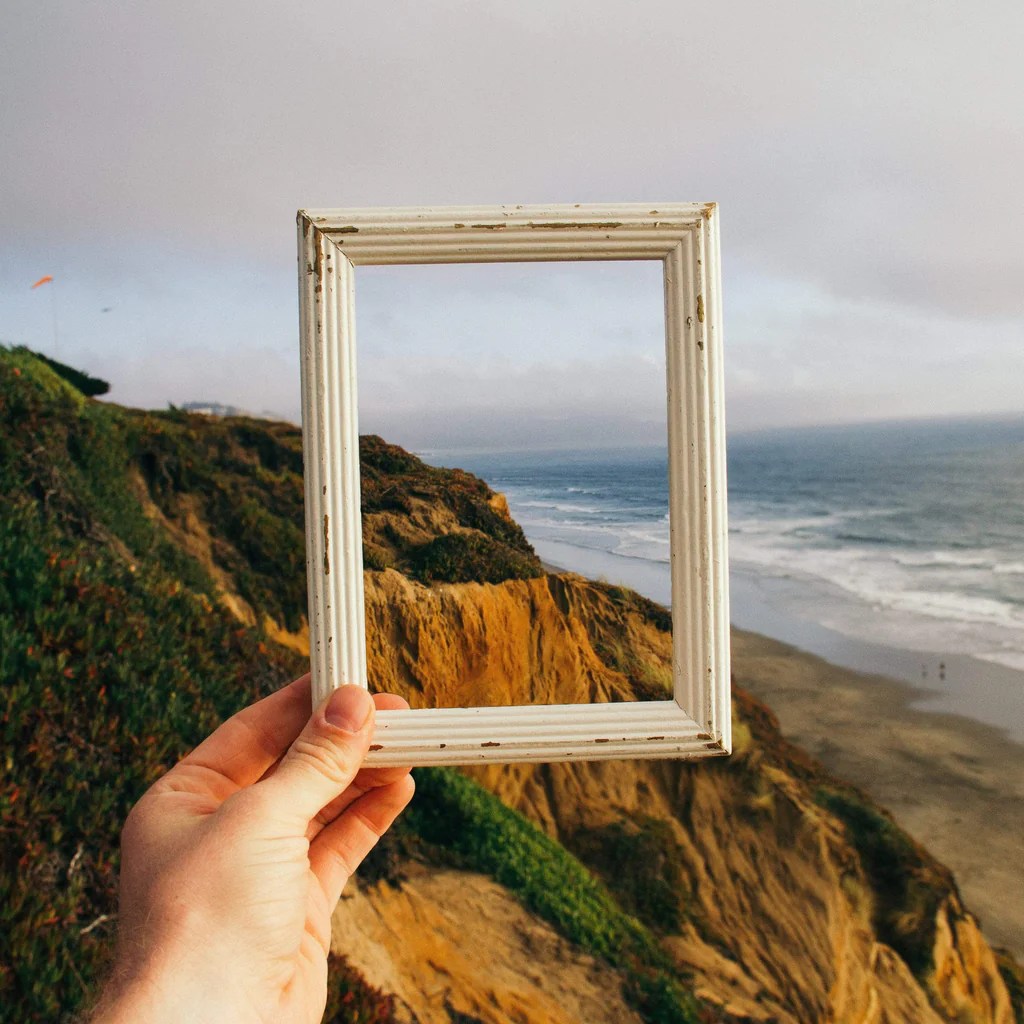
Use framing techniques for landscapes
Framing in photography refers to the intentional use of natural or manufactured elements to enclose, surround or highlight the subject of an image. Framing is a great way to add interest and depth to your photos. You can use natural frames, like trees or rocks, or manufactured ones, like doors and windows.
By doing this, photographers can draw the viewer’s attention to the subject and add visual interest to the composition. Other techniques, such as placing the subject in the foreground while allowing a blurred background to frame it, can provide added context and depth to the image.

Framing involves cutting off part(s) from around another area within your shot so that only certain parts remain visible for viewing. Think about how often you’ve seen someone framing something like flowers against green foliage outside?
The key is framing to enhance the appearance and add to the overall story or message conveyed. The framing technique works best when there aren’t too many distractions surrounding whatever needs framing. Otherwise, those other elements might distract from what was initially intended as the focal point.
Use imagery that contrasts with your subject’s background
Contrasting imagery is one of the most powerful tools in photography to make your subject stand out. Contrast can also add interest to an image or give it an artistic feel. A typical contrast example is placing a dark object against a light background.
A dark thing against a light background draws attention to that object because it’s different from everything else around it.
Another great way to use contrast is by including multiple elements in your photo; for example, having both bright colours and dark shadows or using both close-up shots (macro) and landscape views will create more depth in your composition than just one type alone would provide.
Keep the horizon level
Keeping the horizon level is essential in photography composition, especially when shooting landscapes or seascapes. Levelling the horizon makes your images appear more natural and pleasing to the viewer’s eye, and it avoids the sense of discomfort or disorientation caused by a tilted horizon.
Many cameras and editing software have tools to help you straighten the horizon line, but it’s also a good idea to keep an eye on the horizon as you shoot and make adjustments as needed.
Additionally, you can incorporate other compositional techniques, such as leading lines or the rule of thirds, to create a more exciting photo. If you’re looking for a quick fix for your composition, the easiest thing to do is keep the horizon level. If you tilt the camera up or down, everything in your photo will look skewed.
To start with this principle, you only need to find an object that makes sense as a reference point (e.g., a building, tree, or person) and then line it up with one of those two lines on either side of your viewfinder/screen.
From there, adjust yourself so that both sides match perfectly: no more crooked horizons!
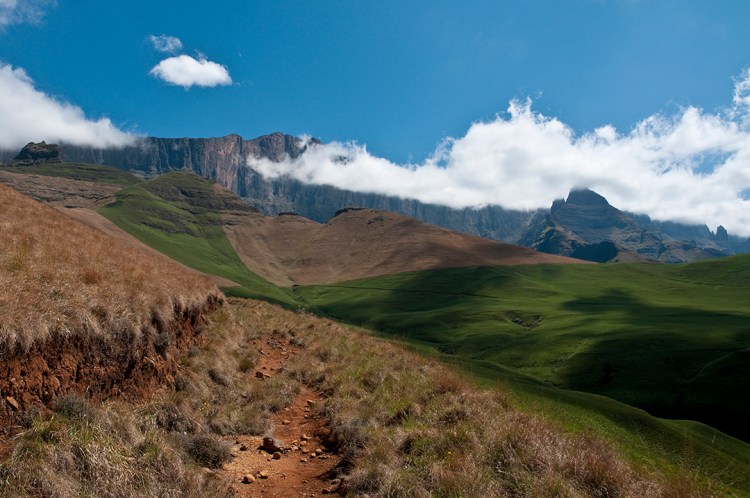
Create depth by using depth-of-field layers
Achieving a sense of depth in your photos is an easy way to make them more exciting and engaging. You can create foreground, midground and background layers in your frame. For example, if you’re taking a photo of a landscape scene with mountains in the distance and water in front of them, try placing yourself or another object (like a tree) between those two elements to appear as separate planes on top of each other.
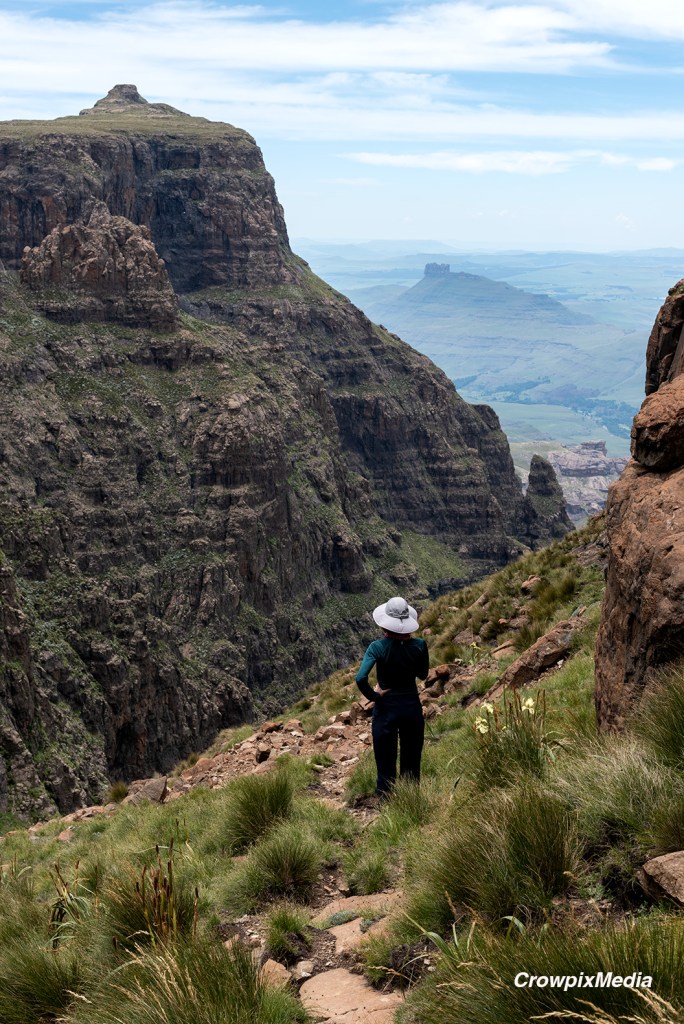
For example, use an object in the foreground to frame your subject and develop a sense of depth. Alternatively, you might place a contrasting element in the middle ground to add visual interest and emphasise the subject.
Additionally, layers can help you tell a complete story or convey a specific mood or emotion within your photograph. Experiment with different layers and placements to see what works best for your composition and style.
Avoid cutting your subject out of the frame
Many photographers make the common mistake of cutting off the bottom of their subjects. It’s essential to avoid this because it can remove context and make it look like you didn’t know what you were doing.
In this photo, we have someone holding a camera and looking at something interesting in front of them (I’m assuming). However, because there’s no context given for what they’re looking at or who they are and because I don’t see any feet, it seems their camera has decapitated them.
Not showing enough space above or below our main subject makes it difficult for viewers who want more information about what happened during the photo shoot. Moreover, if other people took these types of images, then maybe there were some exciting stories behind the scenes, which may explain why these particular animals looked so excited when photographed.
Consider contrast
You may have seen the light, but what about the shade? When taking photos, it’s important to use light and shade to create contrast. Contrast is what makes your photos interesting. You can use contrast by using light and shadow or just plain old dark areas in your photos, but either way, it will help make your image look more professional.
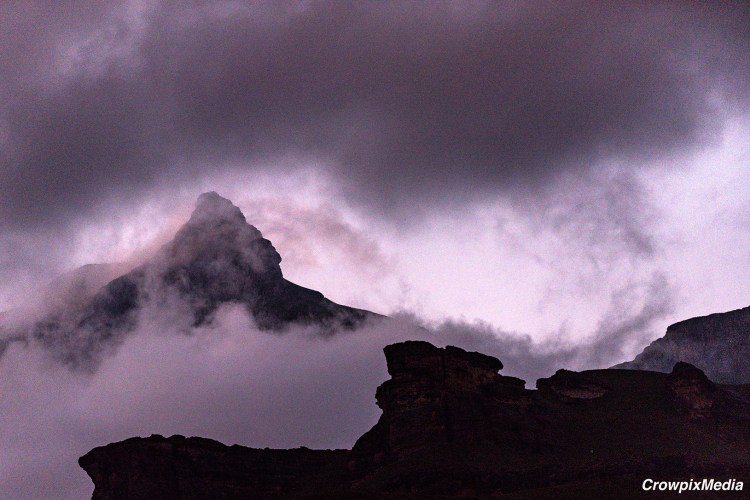
Contrast is essential in photography composition, as it can help create visual interest, depth, and dimensionality within your images. There are various types of comparison, including tonal contrast (the difference between light and dark areas), colour contrast (the difference between colours), and texture contrast (the difference between smooth and rough surfaces).
By leveraging these types of contrast, you can create dynamic and engaging compositions that draw the viewer’s eye and build a sense of mood, emotion, or narrative within your photographs. Experiment with different types of contrast in your compositions to see what works best for your style and subject matter.
Conclusion
Use these tips to improve your digital photography composition skills. Composition is an essential part of photography, but figuring out how to improve your photos can be intimidating. If you’re looking for tips on improving your composition skills, we hope this article has given you some ideas.
Composition refers to how your image looks and feels. It’s about arranging the different elements within a photograph, like lines and shapes; it has nothing to do with perspective or depth of field (although these things are related). Composition affects how people perceive your photos- whether they see them as aesthetically pleasing or dull- and can affect whether they share them online with friends or family.
If you want to take better photos, thinking about composition is essential. You don’t have to be an expert, but following these six principles will help you take awe-inspiring pictures! Hopefully, you now better understand how to use composition in digital photography. If you want to keep improving your skills, there are plenty of resources available online that can help.
You can also try experimenting with different types of shots and see what works best for each one!
Copyright@Crowpixmedia. All Rights Reserved 2026.

3 thoughts on “How to Create Awe Inspiring Photos: The Ultimate Composition Guide”